⚠️ Note that this post hasn't been updated for at least a year and the information may be outdated, proceed with caution! (Last updated: April 19, 2020)
At the time or writing there is no documentation on HubSpot about how to set a custom module's "Display conditions" if you're using local development for HubSpot CMS Hub Themes.
While it's likely to be published soon, here's a quick how to to tide you over in the meanwhile.
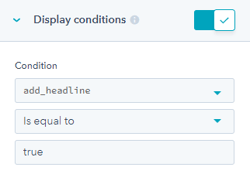
In the UI, a field's "Display Conditions" looks like this:

The example above only shows this field of the "Add Headline" boolean field is enabled.
The current suggested workaround is to set this in the UI, you can pull this back into your local development tool by using the fetch command with --override (watch out using override).
When you do this, this is what's pulled into your fields.json file:
[
  {
    "name" : "headline",
    "label" : "Headline",
    "required" : false,
    "locked" : false,
    "validation_regex" : "",
    "allow_new_line" : false,
    "show_emoji_picker" : false,
    "type" : "text",
    "default" : "HAVE A NICE DAY",
    "visibility" : {
      "controlling_field" : "add_headline",
      "controlling_value_regex" : true,
      "operator" : "EQUAL",
      "access" : null,
      "hidden_subfields" : null
    }
  }
]
so you can use the visibility parameter to set your field's "Display Conditions", and update the text in bold below:
  "visibility" : {
    "controlling_field" : "field_name",
    "controlling_value_regex" : "field_value",
    "operator" : "EQUAL",
    "access" : null,
    "hidden_subfields" : null
  }
These are the available operator values:
- EQUAL (is equal to)
- EMPTY (is empty)
- NOT_EMPTY (is not empty)
- NOT_EQUAL (is not equal to)
- MATCHES_REGEX (custom regex)